Learning Center

Post Anchoring:
The posts of your structure must be fastened securely to either a concrete slab, concrete footings or piers, or a sufficiently anchored wooden or composite deck, as detailed below.
We include all hardware necessary to accomplish this task in our pergola and pavilion kits. We include post brackets, bolts, and decorative moldings to hide hardware from view. By default we assume your are fastening your posts to concrete. We therefore include stainless steel wedge anchors.
If you are instead fastening your posts to a wooden or composite deck, we can include lag bolts instead upon request.
Pergola Kits (cedar, pine, and vinyl): We include our powder coated steel L-brackets in all of our cedar, pine, and vinyl pergola kits. Two L-brackets per post offers sufficient anchoring for most areas of the United States. Four L-brackets per post are suggested for high wind areas such as hurricane zones in Florida and the Gulf States.
If your structure includes longer than normal spans between posts, or extra tall posts, you will need the extra stability afforded by our powder coated heavy duty steel post brackets.
The above treatment has been tested repeatedly and confirmed over decades by multiple structural and professional engineers, and by thousands of assembled structures in the field. In addition to powder coated steel, both these types of post brackets are available in stainless steel. This is typically requested only by customers who expect repeated exposure to salt water.
Pavilion Kits (cedar, pine, and vinyl): We include our powder coated steel L-brackets in all our cedar, pine, and vinyl pavilion kits. Two brackets per post may be sufficient for certain sizes and locales, but we suggest four per post for high wind areas including Florida and the Gulf States.
If your structure includes longer than normal spans between posts, or extra tall posts, you will need the extra stability afforded by our powder coated heavy duty steel post brackets.
The above treatment has been tested repeatedly and confirmed over decades by multiple structural and professional engineers, and by thousands of assembled structures in the field. In addition to powder coated steel, both these types of post brackets are available in stainless steel. This is typically requested only by customers who expect repeated exposure to salt water.
Structural Fiberglass Pergolas: For concrete, anchor your posts as shown in our assembly instructions. We include all necessary hardware with the kit. This schematic summarizes the arrangement.
To anchor to a wooden or composite deck, use our deck plates in varying diameters and sizes, such as our 8" Round or 8" Square. We include all hardware with the kit. This schematic depicts post anchoring to decks.
For high wind areas, or for added strength and stability, we recommend our heavy duty anchoring system. We also require this for spans between posts of 18ft or more.
Pavers or stone: You cannot fasten your posts to pavers or stone, including bluestone or flagstone. It is not safe. If you are planning to lay a paver or stone patio in the near future, we suggest first pouring footings as follows:
- pour footings beneath the pavers, one footing for each post of your structure. Most people prefer the top of the footing to be below the bottom of the pavers.
- wait for the footings to cure.
- fasten the posts to the cured footings using hardware we supply, according to our instruction manual.
- assemble the structure
- lay pavers to the edge of the post.
- lower the decorative molding to the bottom of the post to hide post anchoring hardware and edge of pavers.
- Important to note: if you intend to add pavers/stone above the top of your footings, please increase the post height to account for the thickness of the pavers/stone.
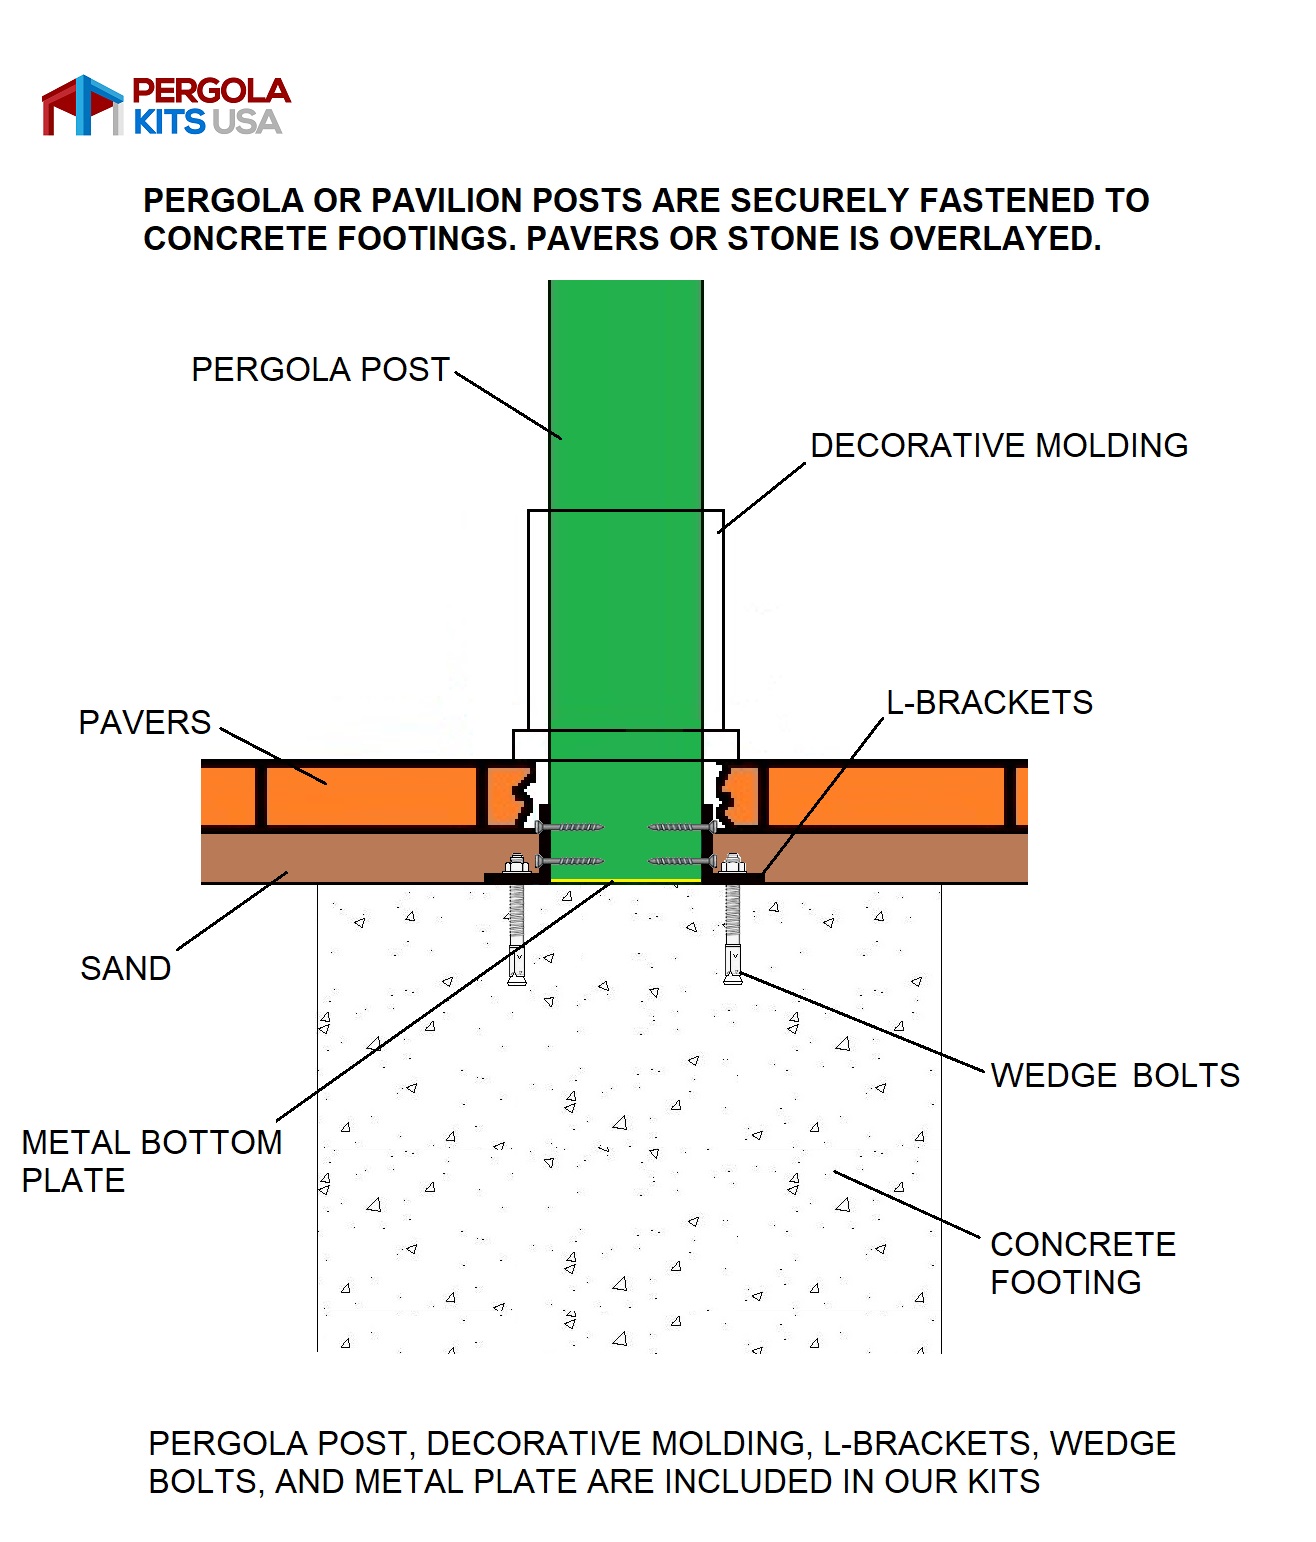
The diagram below illustrates the final arrangement post-assembly for wood posts over pavers or stone. See this image for final arrangement for a fiberglass post. We supply you with a set of shop drawings which will indicate where your post centers (and footing centers) will need to be.
If you already have a paver or stone patio in place, and want to place a pergola or pavilion over this surface, remove a few pavers at the location of each post, and follow steps #1-7 above.
The width and depth of the footing depends on the size and type of structure you are assembling, and the geography of the assembly site (wind speed, frost depth, etc.).

Wooden or composite decks: To fasten your post to a wooden or composite deck, bolt your post brackets or deck plates to the deck using supplied lag bolts. The bolts must sink below the floorboards and into the deck joists. If there is no joist where you want to sink the bolt, add blocking beneath the deck.
Joists are wooden planks, typically 2"x6" or 2"x8", that the floorboards rest on. See this pic for a visual. Blocking is simply a piece of wood, say 6"x6"x24", that you place beneath the deck if there is no joist where you want to place the bolt.
Classic Pergola Kit Assembly Manuals:
Classic Cedar
Classic Cedar Wall-Mounted (Attached)
Classic Cedar In-Line (Arbor)
Classic Vinyl
Classic Vinyl Wall-Mounted (Attached)
Classic Vinyl In-Line (Arbor)
Options:
Wood Lattice Top
Wood Lattice Wall
Serenity Pergola Kit Assembly Manuals:
Serenity Cedar
Serenity Cedar Wall-Mounted (Attached)
Serenity Vinyl
Arched Cedar & Homestead Pergola Kit Assembly Manuals:
Arched Cedar Pergola
Homestead Pergola
Cedar Pavilion Assembly Manuals:
Grand Cedar Pavilion
Cedar Traditional (Hip) Roof
Cedar Traditional (Hip) Roof - Stick Built Version
Cedar Gabled Roof
Cedar Gabled Roof - Stick Built Version
Lean-To Pavilion Assembly Manual
Vinyl Pavilion Assembly Manuals:
Vinyl Traditional (Hip) Roof
Vinyl Traditional (Hip) Roof - Stick Built Version
Vinyl Open Gable Roof
Vinyl Open Gable Roof - Stick Built Version
Options:
Vinyl Ceiling Option for Pavilions Assembly Manual
Gazebos:
Structural Fiberglass Pergolas:
Infinity Canopies:
Infinity Canopy Brochure
Infinity Canopy Maintenance and Warranty
Infinity Canopy Specifications
Infinity Canopy Configuration Options
Infinity Canopy Installation Manual
Infinity Canopy Installation Manual - Pulley System
Infinity Canopy Installation Manual - Magnetic Latch System
Infinity Canopy Opening & Closing Options
Phifertex Plus Mesh Fabric Color Options
Phifertex Cleaning Instructions
Phifertex Fire Rating
Sunbrella Fabric Color Options
Sunbrella Specifications
Sunbrella Cleaning Instructions
Sunbrella Stain Cleaning Guide
Pergola Kits USA Canopies:
Pergola Kits USA Canopy Colors
Pergola Kits USA Canopy Installation Manual
Pergola Kits USA Side Shade Installation Manual
Pergola Kits USA Canopy pictures here & here
Helpful Information:
- Pergola Kits USA Catalog
- How to handle pavers
- Crated orders ready to ship (image)
- Assembler Guidance
- Electrical Package Contents
- Delivery Instructions
- Shingle Color Options
- Vinyl Color Options
- All about pergola shade
- Differences between Serenity & Classic
- Check out our gallery of customer photos
- Comparison of pergola materials
- What does a pavilion ceiling look like?
